
根据微软发布的Windows 11操作系统要求,这个版本的系统需要硬件支持受信任的平台模块 (TPM) 才能进行安装和使用,不然就会提示你“这台电脑无法运行Windows11。这台电脑不符合安装此版本的Windows所需的最低系统要求。有关详细信息,请访问https://aka.ms/WindowsSysReq”错误。关于受信任的平台模块(TPM)的功能和技术这里不再概述,具体的官方文档说明可以看这里。
本文主要说明如何在独立的ESXi主机上安装Windows 11 23H2的操作过程,为什么说是在独立的ESXi主机呢?
通常情况下,如果我们的安装环境是笔记本或者台式机,并且主板带有TPM 2.0芯片,那么可以直接安装系统,无需多言,或者我们想基于操作系统之上通过VMware Workstation、VirtualBox以及HyperV这种嵌套虚拟化的方式安装Windows 11,只需要在配置虚拟机硬件的时候对虚拟机进行加密即可,比如官方文档或者这里,当然如果使用低版本的客户端程序可能默认不提供Windows 11选择,只需要选择Windows 10对虚拟机加密并手动添加可信平台模块(TPM)也可以,比如这里。上述这些情况的前提条件是,你的硬件必须要支持TPM的情况下才能进行,如何确定你的硬件是否支持TPM呢?可以看这里。但是,如果我的虚拟化客户端既不支持Windows11,又不支持TPM,然后又想安装Windows 11怎么办呢?可以参考这里绕过TPM检查。
如果是企业级VMware vSphere环境,可以通过在虚拟机上配置虚拟TPM(vTPM)将TPM2.0用作虚拟设备,对于vSphere 7.0 U2之前,需要单独配置密钥服务器(KMS),对于vSphere 7.0 U2之后,在vCenter Server中内置了vSphere Native Key Provider功能,可以更加方便的为虚拟机配置vTPM,具体可以看这里。使用vTPM的一个主要好处是,底层ESXi主机中可以不需要物理TPM芯片,并且通过加密存储密钥的.nvram文件来保护vTPM密钥。用于加密vTPM的加密密钥由密钥提供程序置备,该提供程序可以是符合KMIP的外部标准密钥提供程序(SKP),也可以使用vCenter Server的内置本机密钥提供程序(NKP)。这些关键提供程序及其配置使用管理需要使用vCenter Server,从而在使用vTPM功能时提供集中式控制平面和无缝的用户体验。但是,这里要使用vTPM的前提是,环境中必须要vCenter Server,虽然强烈建议使用vCenter Server以获得更良好的vTPM用户使用体验,但从技术上讲,vTPM运行并不需要它。
这也是写本篇文章的主要原因,对于使用VMware ESXi虚拟化的HomeLab环境,可能只有一台主机(工作站或服务器)安装了ESXi,并不需要vCenter Server进行管理,但是又想使用vTPM功能,比如本篇文章中安装Windows 11需要vTPM,这时可以参考本篇文章中的方法,如何在独立的ESXi主机上为虚拟机添加vTPM。
- 警告:ESXi主机最好支持TPM,并开启密钥持久性,若没有TPM请看最后。
- 注意:ESXi主机需要获得许可证,除免费的ESXi之外的任何许可都没问题。
- 前提:客户机连接需要准备PowerShell(系统自带)和PowerCLI(安装参考)。
由于默认的PowerCLI模块中不支持某些指令,比如ESXi主机上加密vSphere APIs,所以需要创建几个PowerCLI指令,这些指令由PowerShell脚本文件(vTPMStandaloneESXiFunctions.ps1)创建,只需要在PowerShell里执行这个脚本文件后,即可轻松地为不受vCenter Server管理的独立ESXi主机配置vTPM。脚本可以通过上面的链接地址进行下载,或者将下面的内容复制到记事本里,另存为vTPMStandaloneESXiFunctions.ps1即可。
vTPMStandaloneESXiFunctions.ps1
# Author: William Lam
# Description: PowerCLI functions to configure host encryption for a standanlone ESXi host to support vTPM without vCenter Server

Function New-256BitKey {

    # Generate 256 bit key
    # Thank you ChatGPT for this code
    $randomKey = [byte[]]::new(32)
    $rand = [System.Security.Cryptography.RandomNumberGenerator]::Create()
    $rand.GetBytes($randomKey)

    # Encode the key using Base64
    return [Convert]::ToBase64String($randomKey)
}

Function Prepare-VMHostForEncryption {

    $cm = Get-View $global:DefaultVIServer.ExtensionData.Content.CryptoManager

    $cryptoState = (Get-VMHost).ExtensionData.Runtime.CryptoState

    if($cryptoState -eq "incapable") {
        Write-Host -ForegroundColor Yellow "`nPreparing ESXi Host for encryption ..."
        $cm.CryptoManagerHostPrepare()
        Write-Host -ForegroundColor Green "Successfully prepared ESXi Host for encryption ...`n"
    } else {
        Write-Host "`nESXi Host has already been prepared for encryption ...`n"
    }
}

Function New-InitialVMHostKey {

    param(
        [Parameter(Mandatory=$true)][ValidateSet("CREATE","IMPORT")][string]$Operation,
        [Parameter(Mandatory=$true)][String]$KeyName,
        [Parameter(Mandatory=$false)][String]$CSVTPMKeyFile="tpm-keys.csv"
    )

    $cryptoState = (Get-VMHost).ExtensionData.Runtime.CryptoState

    if($cryptoState -eq "safe") {
        Write-Host -ForegroundColor Red "`nESXi host has already been configured with initial host key ...`n"
        break
    }

    if($cryptoState -ne "prepared") {
        Write-Host -ForegroundColor Red "`nESXi host has not been prepared for encryption ...`n"
        break
    }

    $cm = Get-View $global:DefaultVIServer.ExtensionData.Content.CryptoManager

    # Create or import initial host key
    if($Operation -eq "CREATE") {
        Write-Host -ForegroundColor Yellow "Generating random 256 bit host key ..."
        $hostBase64Key = New-256BitKey
        $keyAlgorithim = "AES-256"
    } else {
        $csvfile = Import-Csv $CSVTPMKeyFile
        foreach ($line in $csvfile) {
            if($line.KEYID -eq $KeyName -and $line.TYPE -eq "HOST") {
                Write-Host -ForegroundColor Yellow "Importing existing host key from $CSVTPMKeyFile ..."
                $hostBase64Key = $line.DATA
                $keyAlgorithim = $line.ALGORITHIM
                break
            }
        }
    }

    if($hostBase64Key -eq $null) {
        Write-Host -ForegroundColor Red "Failed to find host key ${KeyName} ...`n"
        break
    }

    $hostKeyId = New-Object VMware.Vim.CryptoKeyId
    $hostKeyId.keyId = $KeyName

    $hostKeySpec = New-Object VMware.Vim.CryptoKeyPlain
    $hostKeySpec.KeyId = $hostKeyId
    $hostKeySpec.Algorithm = $keyAlgorithim
    $hostKeySpec.KeyData = $hostBase64Key

    Write-Host -ForegroundColor Yellow "Adding ESXi Host Key ${KeyName} ..."
    try {
        $cm.CryptoManagerHostEnable($hostKeySpec)
    } catch {
        Write-Host -ForegroundColor Red "Failed to add host key ${KeyName} ...`n"
        break
    }

    # Automatically backup host key to CSV file
    if($Operation -eq "CREATE") {
        if (Test-Path -Path $CSVTPMKeyFile -PathType Leaf) {
            Write-Host -ForegroundColor Yellow "ESXi TPM Keys file $CSVTPMKeyFile exists, please use import operation"
        } else {
            $newcsv = {} | Select "KEYID","ALGORITHIM","TYPE","DATA" | Export-Csv $CSVTPMKeyFile
            $csvfile = Import-Csv $CSVTPMKeyFile
            $csvfile.KEYID = $KeyName
            $csvfile.ALGORITHIM = $keyAlgorithim
            $csvfile.TYPE = "HOST"
            $csvfile.DATA = $hostBase64Key
            Write-Host -ForegroundColor Yellow "Exporting ${KeyName} to $CSVTPMKeyFile ..."
            $csvfile | Export-CSV -Path $CSVTPMKeyFile
        }
    }
    Write-Host -ForegroundColor Green "Successfully added initial host encryption key ${KeyName} ...`n"
}

Function New-VMTPMKey {

    param(
        [Parameter(Mandatory=$true)][ValidateSet("CREATE","IMPORT")][string]$Operation,
        [Parameter(Mandatory=$true)][String]$KeyName,
        [Parameter(Mandatory=$false)][String]$CSVTPMKeyFile="tpm-keys.csv"
    )

    $cm = Get-View $global:DefaultVIServer.ExtensionData.Content.CryptoManager

    # Ensure ESXi host encryption is enabled
    if($cm.Enabled) {
        # Create or import VM key
        if($Operation -eq "CREATE") {
            Write-Host -ForegroundColor Yellow "Generating random 256 bit VM key ..."
            $vmBase64Key = New-256BitKey
            $keyAlgorithim = "AES-256"
        } else {
            $csvfile = Import-Csv $CSVTPMKeyFile
            foreach ($line in $csvfile) {
                if($line.KEYID -eq $KeyName -and $line.TYPE -eq "VM") {
                    Write-Host -ForegroundColor Yellow "Importing existing VM key from $CSVTPMKeyFile ..."
                    $vmBase64Key = $line.DATA
                    $keyAlgorithim = $line.ALGORITHIM
                    break
                }
            }
        }

        if($vmBase64Key -eq $null) {
            Write-Host -ForegroundColor Red "Failed to find VM key ${KeyName} ...`n"
            break
        }

        $vmKeyId = New-Object VMware.Vim.CryptoKeyId
        $vmKeyId.keyId = $KeyName

        $vmKeySpec = New-Object VMware.Vim.CryptoKeyPlain
        $vmKeySpec.KeyId = $vmKeyId
        $vmKeySpec.Algorithm = $keyAlgorithim
        $vmKeySpec.KeyData = $vmBase64Key

        Write-Host -ForegroundColor Yellow "Adding VM key ${KeyName} ..."
        try {
            $cm.AddKey($vmKeySpec)
        } catch {
            Write-Host -ForegroundColor Red "Failed to add VM key ${KeyName} ...`n"
            break
        }

        # Automatically backup VM key to CSV file
        if($Operation -eq "CREATE") {
            if (Test-Path -Path $CSVTPMKeyFile -PathType Leaf) {
                $tmp = [PSCustomObject] [ordered]@{
                    KEYID = $KeyName;
                    ALGORITHIM = $keyAlgorithim;
                    TYPE = "VM";
                    DATA = $vmBase64Key
                }
                Write-Host -ForegroundColor Yellow "Exporting ${KeyName} to $CSVTPMKeyFile ..."
                $tmp | Export-CSV -Append -NoTypeInformation -Path $CSVTPMKeyFile
            } else {
                Write-Error "Unable to find $CSVTPMKeyFile ..."
            }
        }
        Write-Host -ForegroundColor Green "Successfully added VM encryption key ${KeyName} ...`n"
    } else {
        Write-Host -ForegroundColor Red "`nESXi host has not been prepared for encryption ...`n"
    }
}

Function Remove-VMTPMKey {

    param(
        [Parameter(Mandatory=$true)][String]$KeyName,
        [Parameter(Mandatory=$false)][Boolean]$Force=$false
    )

    $cm = Get-View $global:DefaultVIServer.ExtensionData.Content.CryptoManager

    $key = $cm.ListKeys($null) | where {$_.KeyId -eq $KeyName}
    Write-Host -ForegroundColor Yellow "Removing VM key ${KeyName} ..."
    try {
        $cm.RemoveKey($key,$Force)
    } catch {
        Write-Host -ForegroundColor Red "Failed to remove VM key, maybe in use or use -Force option to forcefully remove ...`n"
        break
    }
    Write-Host -ForegroundColor Green "Successfully removed VM key ...`n"
}

Function Get-VMHostTPMKeys {


    $cm = Get-View $global:DefaultVIServer.ExtensionData.Content.CryptoManager

    if($cm.Enabled) {
        $cm.ListKeys($null)
    } else {
        Write-Host -ForegroundColor Red "`nESXi host has not been prepared for encryption or does not contain initial host key ...`n"
    }
}
Function Reconfigure-VMWithvTPM {

    param(
        [Parameter(Mandatory=$true)][String]$KeyName,
        [Parameter(Mandatory=$true)][String]$VMName
    )

    $vm = Get-VM $VMName

    $cm = Get-View $global:DefaultVIServer.ExtensionData.Content.CryptoManager

    # Retrieve VM key
    $cryptoSpec = New-Object VMware.Vim.CryptoSpecEncrypt
    $cryptoSpec.CryptoKeyId = $cm.ListKeys($null) | where {$_.KeyId -eq $KeyName}

    $spec = New-Object VMware.Vim.VirtualMachineConfigSpec

    # Set VM encryption key
    $spec.Crypto = $cryptoSpec

    # Add TPM device
    $spec.deviceChange = New-Object VMware.Vim.VirtualDeviceConfigSpec
    $spec.deviceChange[0].operation = 'add'
    $spec.deviceChange[0].device = New-Object VMware.Vim.VirtualTPM
    $spec.DeviceChange[0].Device.Key = 11000

    # Reconfigure VM
    Write-Host -ForegroundColor Yellow "Adding vTPM to ${VMName} using encryption key ${KeyName} ..."
    $task = $vm.ExtensionData.ReconfigVM_Task($spec)
    $task1 = Get-Task -Id ("Task-$($task.value)")
    $task1 | Wait-Task
}
1.在PowerShell里运行vTPMStandaloneESXiFunctions.ps1脚本文件以获取指令;
. .DesktopvTPMStandaloneESXiFunctions.psl //脚本存放的绝对位置
2.使用Connect-VIServer连接到独立的ESXi主机;
Connect-VIServer 192.168.32.1 -User root -Password xxxxxx //ESXi用户名和密码
3. 运行Prepare-VMHostForEncryption命令,该命令将为ESXi主机进行加密做准备;
Prepare-VMHostForEncryption
4.运行New-InitialVMHostKey命令,为主机生成一个加密密钥并取一个名字;
New-InitialVMHostKey -Operation CREATE -KeyName "host-key-1"
注:这个操作只需要在主机上执行一次就行。
5.运行New-VMTPMKey命令,为需要vTPM的虚拟机创建一个加密密钥并取一个名字;
New-VMTPMKey -Operation CREATE -KeyName "windows-11-key"
6.运行Get-VMHostTPMKeys命令,可以列出所有主机和虚拟机的加密密钥;
Get-VMHostTPMKeys
7.最后,运行Reconfigure-VMWithvTPM命令,将刚创建的虚拟机加密密钥附加给需要vTPM的虚拟机;
Reconfigure-VMWithvTPM -KeyName "windows-11-key" -VMName "win11"
注:-VMName后面的名字为环境中实际创建的虚拟机名字。
如果一切顺利,这时你登陆VMware Host Client,找到刚刚完成加密的虚拟机(win11),右击编辑设置,可以看到“可信平台模块”已被添加。现在,你应该可以打开虚拟机电源,正常安装Windows 11操作系统了。

Windows 11 23H2首次启动时可使用Shift + F10或Shift + Fn + F10调出CMD运行oobeBypassNRO.cmd命令跳过微软账户强制登录。
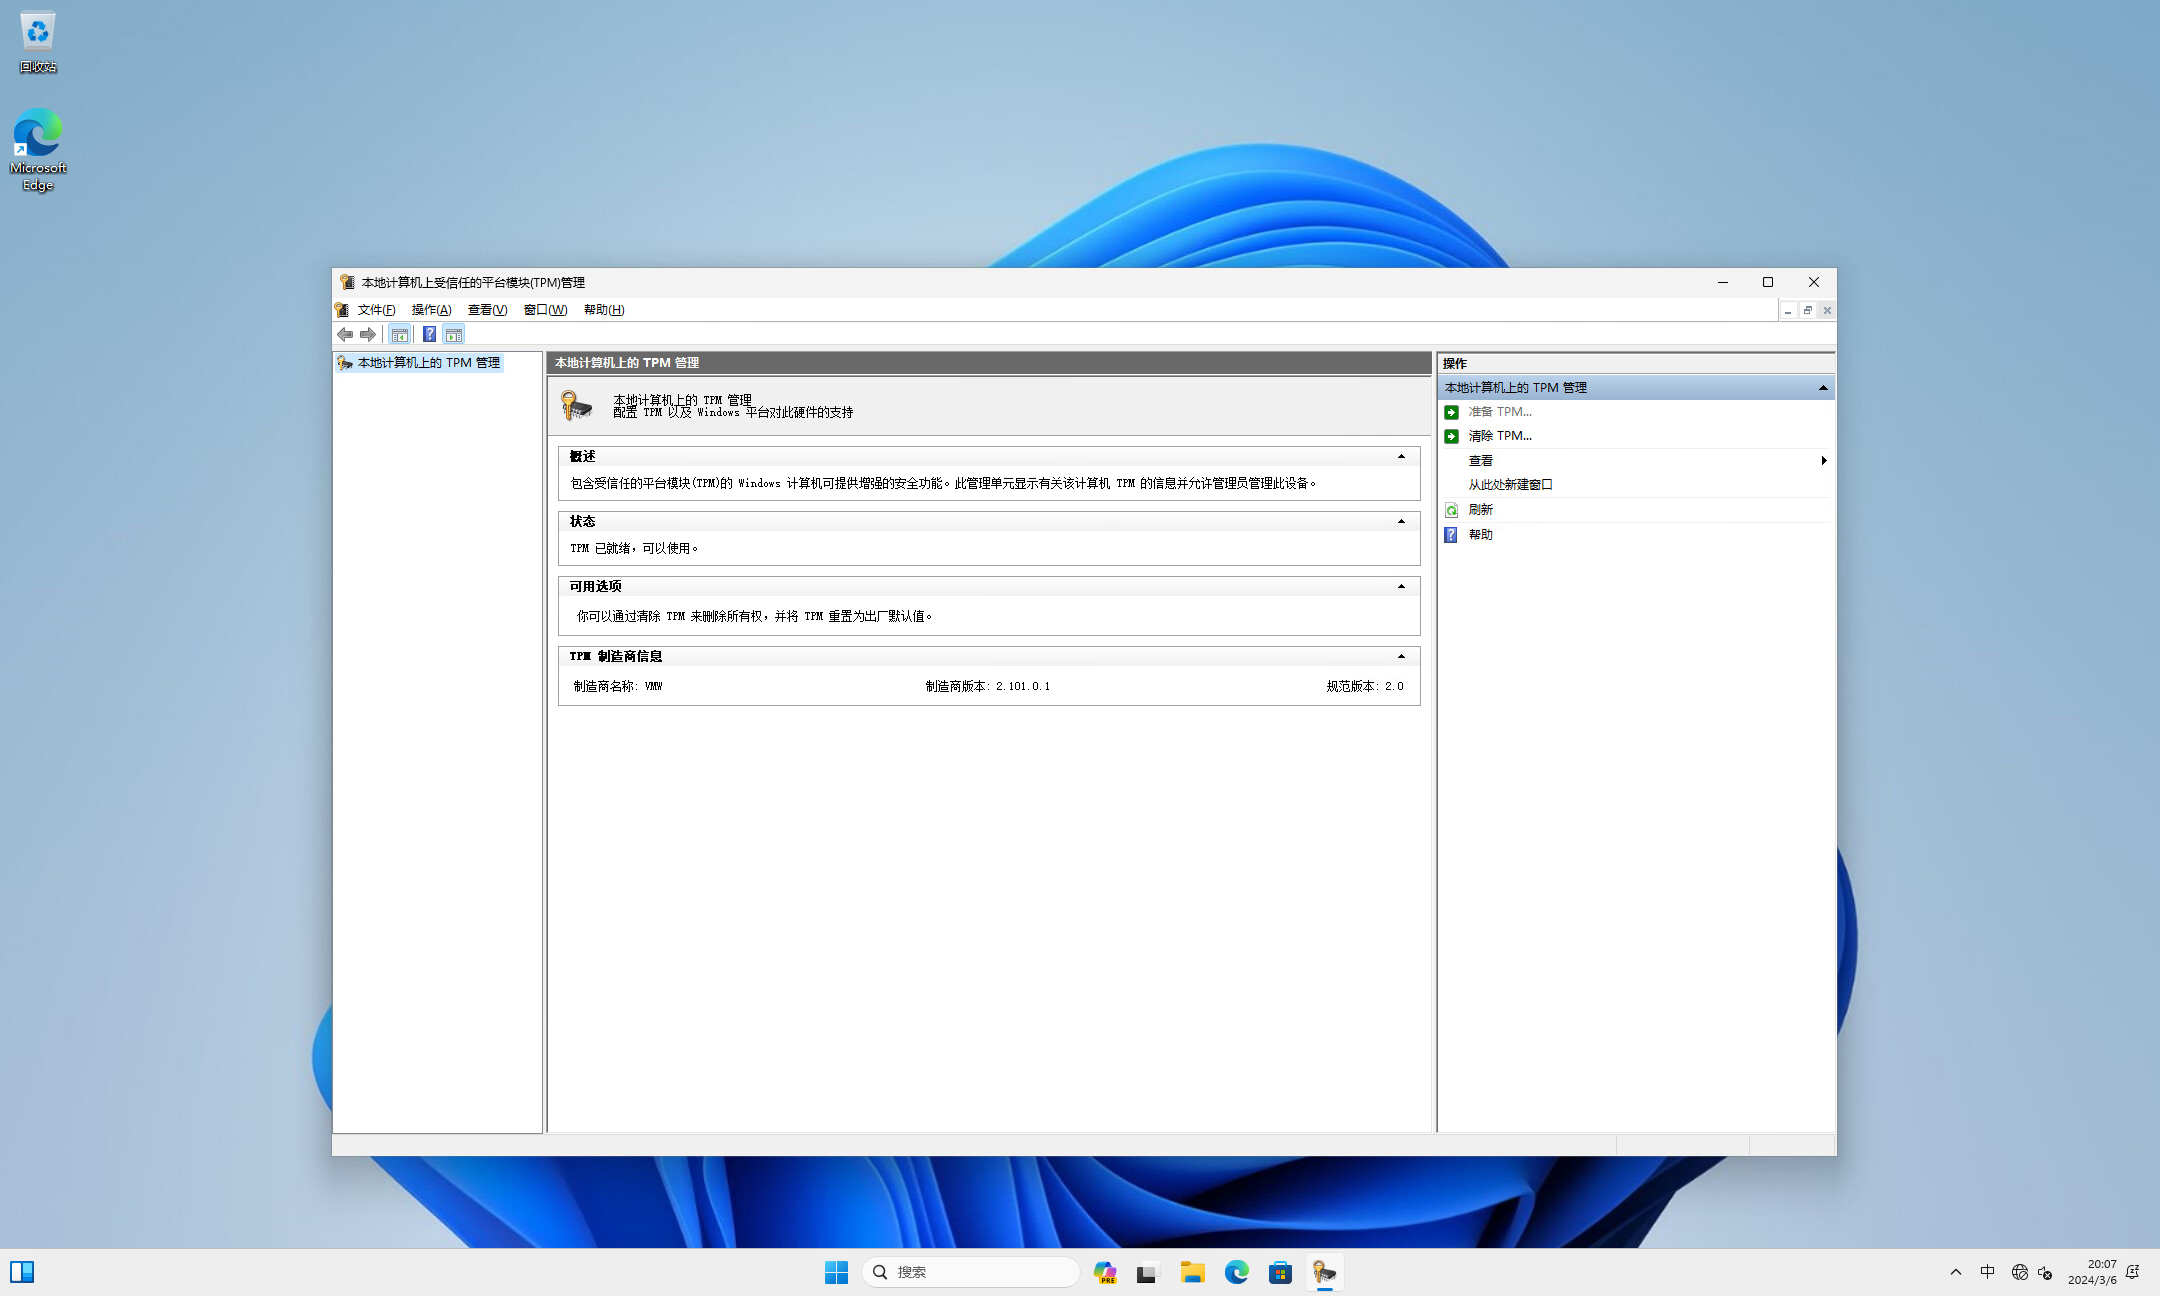
进入系统后,打开Win + R运行窗口运行tpm.msc进入TPM管理,可以看到虚拟机的TPM制造商为VMW发布的vTPM,规范版本为2.0。
如果需要删除虚拟机的加密密钥,运行Remove-VMTPMKey命令即可进行删除,可以添加-Force $true选项进行强制删除。
Remove-VMTPMKey -KeyName "windows-11-key" -Force $true
默认情况下,ESXi不会在重新引导时存储或保存任何加密密钥!您需要重新添加已分配给虚拟机的所有主机和任何虚拟机加密密钥,否则将无法打开虚拟机电源。这是vCenter Server通过管理由SKP或NKP置备到相应ESXi主机的加密密钥以确保其可用而提供的主要优势和功能之一。
这就是拥有物理TPM非常有用的地方!如果您具有符合AND标准的物理TPM 2.0芯片(需要FIFO而不是CRB协议),则可以按文章开头的警告说明在ESXi中启用密钥持久性功能,然后已添加到ESXi主机的所有加密密钥将会自动保留。
如果您没有符合物理且兼容TPM 2.0的芯片,作为解决方法,在上面的脚本(vTPMStandaloneESXiFunctions.psl)里实现了每次使用PowerCLI函数生成主机或虚拟机加密密钥时的自动加密密钥备份。默认情况下,加密密钥会自动保存到名为tpm-keys.csv的CSV文件中(你可以在你脚本所在的目录找到它)。与上面ESXi主机创建加密密钥类似的过程,使用加密密钥备份文件,我们可以轻松地将所有加密密钥重新导入到ESXi主机上。这样就不用重新生成新的主机或虚拟机加密密钥了。
同上面的方式一样,运行脚本,连接到ESXi主机,使用IMPORT操作从给定的CSV文件里导入指定名称的加密密钥:
. .vTPMStandaloneESXiFunctions.psl
Connect-VIServer xx.xx.xx.xx -User root -Password xxxxxx
Prepare-VMHostForEncryption
New-InitialVMHostKey -Operation IMPORT -KeyName "host-key-1" -CSVTPMKeyFile tpm-keys.csv
New-VMTPMKey -Operation IMPORT -KeyName "windows-11-key" -CSVTPMKeyFile tpm-keys.csv
Get-VMHostTPMKeys
如果密钥已成功导入,您现在应该能够打开已分配了生成的虚拟机加密密钥的任何虚拟机的电源!
按理来说,如果没错,上述方法应该同样也适用于不受vCenter Server管理的独立ESXi-Arm主机。
参考:Support for Virtual Trusted Platform Module (vTPM) on ESXi without vCenter Server?